October 30, 2011

Canalis Shirt Tutorial

Lately I've been on a kid shirt redo kick so I decided to take a break from that and make something for me...finally, something for this Mama...
and, yes, it's another tshirt refashion.
It reminds me of tube corals on a shirt...
and that is why I named it Canalis which is Latin for "tube".
You will need two of the same color shirt; one shirt needs to be one size larger than what you normally wear.  Take the other shirt, fold in half - hot dog style and fold in half - hot dog style, again. Cut it into strips like this:
You will end up with lots of tshirt  loops...cut your loops in half at the seams...you want to take off the seams and then pull each strip till it curls up...do this to each one.
Now take the larger shirt and cut right at the seams...from the bottom of the shirt all the way to the end of the sleeves. You want to open up your shirt completely so that it is easy to sew on the strips of from the other shirt. 

Now start sewing your strips onto the front of the shirt, beginning from the neckline and work your way around the neckline and then start filling down and across...just take one strip and begin sewing and fill up the front of your shirt in any pattern you like. If a strip is too long, just cut it and use elsewhere on the shirt.  Use up as many strips as possible to get it to fill in nicely. Since  your shirt is opened up, you can sew on strips even over the seams at the shoulders and onto the back of the shirt...Have fun with it...Just be careful to sew down the middle of each strip and make sure that the curled up part doesn't get caught with the needle...
like this...but if it does, just stop, put your needle up, release the foot and gently tug and snip off the thread until the shirt is free again 
Once you've filled up the front of the shirt with lots of tshirt tubes, turn the shirt inside out and line up the sides again, pin and sew up again...once with a straight stitch and a second time with a zig-zag.  
And you're done
Once you wash it, the tubes will curl in more...if you end up with some strips that don't want to curl up, just take your scissors and cut across the length of the strip about half ways and they will curl up for you.

Going PINK for Breast Cancer Awarness

Today I am participating in The ArtsyGirl Connection Challenge to dedicate my blog for the day and go PINK in honor of Breast Cancer Awareness.  Here are some PINK tutorials from the past...

No Sew Shirt Refashion

Charming Rose Pin/Clip Tutorial

Star Burst Shirt Refashion Tutorial 

Hearts Tutorial 

Baby Rose Shirt Redo Tutorial

3D Flower Tutorial

For more information on Breast Cancer and how to help beat this, please click here. Together we can make a difference. 


If you want to join in the PINKNESS, please link and share your actual PINK post with everyone for the day.  Grab the linky code and share with your readers as well...go check out who went PINK for the day...

October 27, 2011

You ROCK #7

This past Saturday, we went day tripping to Texas A&M. The Science Department hosted a Chemistry Open House and Science Exploration Day where kids of all ages could get down and dirt in the name of Science.  We had such a fun day playing with gooey things, painting, building, investigating, touching, laughing and along the way, we learned a thing or two about how fun Chemistry really is.
~.~.~.~.~.~.~.~.~.~.~.~.~.~.~.~.~.~.~.~.~.~.~.~.~.~.~.~.~.~.~.~.~.~
So, are you ready to ROCK IT?!
Here are the very simple to follow rules:
1. Link up something that YOU made: sewing, craft, recipe, anything that you would like to share, etc…
2. Link up to the specific post; not your blog.
3. No linking giveaways or items for sale.
4. Visit and comment/encourage at least one fellow blogger friend.
5. Grab this button and post on your blog or post...just somewhere where others can come and link up as well.


<div align="center"><a href="http://www.rocaandcompany.blogspot.com" title="rocaandcompany"><img src="http://i52.tinypic.com/u3mky.jpg" alt="rocaandcompany" style="border:none;" /></a></div>

 And just a simple request, it's optional, only if you want, I'm not gonna make you, BUT it would be nice if you would follow RoCa and Company
So you ready to Party?! Let's ROCK this place!
Also, remember that the party will be open until Monday night. On Wednesday, I will feature the #1 link that ROCKS (the most viewed). I will also showcase my 3 favorites. And to entice you just a little more, the #1 link that ROCKS will also get to be a guest blogger at a future date (of course only if the winner wants too)...Sounds like fun, right?

Guest Blogger: Andréa from The Simple Craft Diaries

Remember this Wire T-Shirt Scarf from The Simple Craft Diaries
Well, Today we have Andréa  sharing another fun and simple tutorial. Her scarf was the top viewed link at last weeks It's A Rockin' Party and therefore she gets to be a guest blogger today...so without further ado, here's Andréa...take it away girl... 

~.~.~.~.~.~.~.~.~.~.~.~.~.~.~.~.~.~.~.~.~.~.~.~.~.~.~.~.~.~.~.~.~.~.~
Hi !!

I am Andréa from  The Simple Craft Diaries and I love to craft! I am a stay at home mom who loves handmade and simple things. I love crafting them for my home, for my friends, for myself and most of all for my little girl, who is most certainly my main inspiration. When I started blogging back in March of this year,  it was mostly about things I would do for her and for her gorgeous golden brown and  long curly hair. Oh, how  I love doing this!! 
So, in keeping  with my "origins", when Carmen invited me (yippee!!) to guest post here, I immediately thought of hair accessories for the fall. They are all very simple and easy, all you need is some felt ( it can be scraps!), scissors, fabric glue or a hot glue gun, hair clips and a headband.

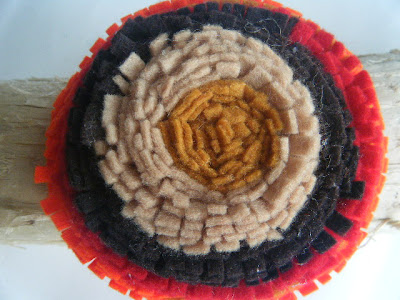
Here they are: A pom pom headband, an over-sized multicolour mum flower hair clip and a single rosette hair clip. I love the fall colors!
POM POM headband:

Material:

1. A round shape ( I used a small sample paint container) around 2 " wide
2. Felt - I used red and brown for the leaves and ochre for the pom pom flower
3. Pen
4. Scissors
5. Fabric glue/hot glue gun ( you can use needle and thread instead)
Make 27 circles, as each pom pom uses 9 of them
Use one of the circles for the bottom , fold the other ones in triangle shapes and start glueing as follows:
Make 2 layers
Cut 2 leaves, fold the bottom part in half and glue to get a leaf shape
Attach to one of the pom poms
Attach the pom poms to the headband
Cut 3 more felt circles to attach to the bottom and secure the flowers
The first fall beauty is ready!
Fall girl!

Oversized Mum Flower

Material:

1. 20 strips of felt in assorted colours - I used orange, red, ochre , beige , red and brown. 9 inches  x 3/4 " inch
2. Hot glue gun or fabric  glue
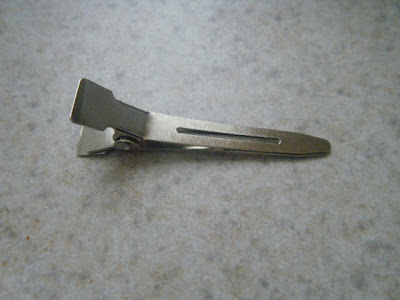
3. Hair clip
4. Scissors

Glue the strips to each other. Use rows of the same colours together. Pick the colour you want for the middle first and start form there. It will be  a very long strip of felt, girl!
Start cutting the edge like this. To make things easier, I used a small scissor
After all the fringes are done, start rolling , glueing as you go.
A long way to go....but it goes fast, do not dismay!
Ready!
Cut a circle of felt for the backing and grab the hair clip
With the hot glue gun, attach them to the back of the mum flower
A perfect photo prop for that perfect fall picture!
I also made a smaller version for everyday use,  it is so easy!

Felt Rosette:

Material:

1. Felt - I used bright orange for the rosette and brown, green and ochre for the leaves
2. Scissors
3. Hot glue or fabric glue
4. Hair clip
Draw a spiral ( I used white felt here to make it easier for you to see)
Cut it out
Start rolling the spiral back and gluing as you go
READY!
Make the leaves the same way we did for the pom pom headband. This time I made  3 of them.
Glue them together
Attach to the rosette
Felt circle for the backing and a hair clip
Attach with the hot glue or fabric glue 
READY!
Ready or not for fall??
Thank you Carmen for inviting me to guest post today,  what a  fun and exciting experience!
Related Posts Plugin for WordPress, Blogger...