August 07, 2011

Dragon Applique T-shirt ~ A Boden Knock Off

My son is not a happy camper right now.  His birthday happens to land on His First Day Of School, as in, he's-going-to-kindergarten-at-the-big-school-first-day-of-school.  It's a big deal for him and kind of over whelming at the same time.  Two big mile stones in his life wrapped up in one day...so, yeah, he's not happy.  
So in order to make His day super special, I made him a shirt to wear for His birthday on His first day of school.
My inspiration was this shirt from Boden.
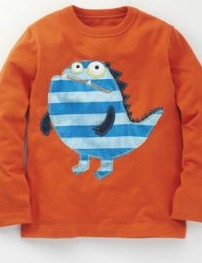
First thing I did was pick-off the pocket from the $1 shirt I bought on clearance.  
I used freezer paper to make a pattern. Looking at the picture in the catalog, I drew my version of the dragon on freezer paper (not on the shiny side).  Can you see all the semi erased lines?  I had a hard time drawing the feet but I finally drew feet that I was happy with.
Using the hand drawn dragon as a template, I placed another piece of freezer paper on top and copied the spikes, eyes, hands and teeth.
I cut out my pattern 
and ironed it (shiny side down) onto the t-shirt fabrics that I used.  These came from t-shirts that don't fit my kids anymore. See the grey fabric?  It's the picked-off pocket and it became part of the eyes. 
Then I ironed fusible web to the back of the t-shirt fabric.  So, basically, the top has the freezer paper ironed on and the back has fusible web ironed on.  Then, cut out the pattern on the freezer paper. Here is the dragon pieced together.  
Remove the freezer paper.  An easy way to do this is to use a pin and make a slit in the middle.  Just run your pin across the paper and peel the paper off.  (I did this for both the freezer paper and the fusible web.)
Now this step you can skip if you want but I did it because my son does not like interfacing on the inside of his shirts.  In order to add some sort of stability and make it easier to sew, I ironed on the dragon to a thin piece of white felt.  Here is the dragon    with the fusible web ready to be ironed onto the felt.
Once the dragon was securely ironed onto the felt, I ironed fusible web to the back of the felt. I cut the dragon again,  this time leaving a small trim. Ironed on the entire applique to the shirt 
and sewed ALL the edges. I think this was the hardest part for me.  There was a lot of stopping and pivoting the needle to get the spikes, hands and feet done.  
By the time I got to the eyes, I wasn't too worried about making perfect circles...
My son was happy with his new shirt and his bribe...you know, just to stand still for a good picture.
This is his response to, "Mijo, give me a big smile"...
Minus the sharp teeth, I think he was trying to imitate the dragon's smile...love it!


I am entering this knock-off into this challenge:


Visit thecsiproject.com

August 03, 2011

Mend a Hole ~ Gap Style

During a recent thrift store run, I bought my son a nice button up shirt.  
I didn't notice that it had a hole right along the side seam. 
So here is what I did. I picked off the pocket and used it to make another pocket out of a cut jean pant's leg. I made sure to use the inseam as a hem for the new pocket.
I sewed on the jean pocket using the outline of where the old pocket used to be. 
You can see the stitch outline on the shirt.
My machine had red thread and I just went ahead and went with it. 
 Using the original pocket, I made a patch for the hole.  I wanted to line up the pattern of the shirt to the pattern of the pocket.  It wasn't perfect, but it was much better than the hole.
I also wanted to reinforce the patch, so I cut a piece of a cotton white sheet to add to the inside of the shirt.  To fuse it together, I used fuseable web. (This picture shows the fabrics before I cut them into squares to fit over the hole.)
I ironed fuseable web to the white cotton and peeled the backing off. I then sandwiched the pocket patch, the shirt hole and the white cotton fabric and ironed it together.  In essence what you want to do is fuse the white cotton fabric to the pocket patch through the hole...whew...I really hope I haven't lost you here.
Then I sewed (I did change the thread here) along the patch.  I added the stitched X as an after thought.  I think it gives the shirt an added detail, like something you would find on a Gap or Old Navy shirt. 
The jean pocket detail also gives the shirt a designer look...
 You can't tell where the hole was...you really need to look hard for it...
Now, I just need to wait for my son to grow into it.  Not only did I not notice the hole in the side seam, I also didn't notice the size.  It should fit him next spring.  I think I was distracted by the price tag of .99 cents. And so the Gapified shirt hangs patiently in my son's closet.

July 31, 2011

Pink Star Burst Shirt Refashion

My youngest sister loves the color pink...in any tone or shade.  A couple of months ago, I bought a long sleeved pink shirt and made this shirt for myself, but then my sister borrowed it.  I haven't seen it since.  I should have known.  Oh well, at least I know the shirt is well cared for and loved very much.  
Here is what I did. I cut off and opened up the sleeves
Then, I cut many long strips 
Pinned them on the shirt like so
Sewed them on...some I just pulled as I sewed and others I gathered as I sewed.  Notice the neckline...well, I figured since the neckline had a raw finish to it so could the sleeves. So the sleeves have a raw, rolled look to them.  They go well with the rest of the shirt.
Added a button and hand tacked the strips just so that they would not fall over the button.  I also cut the strips down the middle...just to give me more strips to tack down because I love extra work.  In hind sight, I wouldn't cut them further. 
 I marked them with little hearts where I tacked the strips down.
And that is it. 
Here is the only time I wore the shirt...for a photo shoot.

The shirt appears in many shades of pink in all these photos but I promise it's all the same shirt.  I blame it on the different camera angles and lighting...and playing on Picnik for this.  But to my sister, I'm sure it's all the same...they are all shades of pink and proof the the shirt was destined for her. Funny how that worked out.     

July 27, 2011

Chilaquiles Verdes Casserole

I love to prepare quick and easy meals. Here is a recipe for the Chilaquiles Verdes Casserole that I made last night. Dinner was served in less than 35 minutes; from start to the dinner table. 
 Here is the recipe:
~1 can Green Chile Enchilada Sauce (28 oz)
~1 can Diced Tomatoes with Green Chiles
~3 cups Shredded Blend of Mild Cheddar and Monterey Jack Cheese
~2 pounds Ground Beef
~1 Bag of  frozen White Shoepeg Corn (I used the steamable bag.)
~1/2 bag of Tostadas
~1 casserole dish 

Preheat oven to 350 degrees. Microwave the White Shoepeg Corn according to directions on bag.  Set aside when done. Brown the ground beef with seasonings but NOT with salt.  Do not add salt to the meat because the Green Chile Enchilada Sauce comes with enough salt for the entire casserole.  Drain and set aside.  Take the tostadas and break in half. Set aside.  Open all cans; drain the liquid from the Diced Tomatoes with Green Chiles. Set aside.  You can mix the White Shoepeg Corn with the browned ground beef if  you want.  I didn't but it doesn't make a difference.  Now, layer all ingredients in this order (bottom to top layer) in the casserole dish: tostadas, enchilada sauce, ground beef and corn, cheese; repeat.  Make as many layers as you need to get to the top of your dish.  Top with the Diced Tomatoes and Chile and final layer of cheese. Here is what it looks like pre oven.
Place the casserole in the oven for 25 minutes.  Let cool a bit before serving.
This is a family favorite in my home...my kids and husband always ask for seconds.  I hope this recipe becomes one of  your family favorites as well.  


July 26, 2011

Fun the the Hot Texas Sun ~ Austin Style

It has been an "I-can't-remember-the-last-time-it-was-this-sweltering-HOT-outside", kinda summer here in Central Texas. So we have been doing a lot of this to beat the SUN and its scorching, blistering, sizzling, stifling and oppressive heat rays.  All I have to say is, In your face Mr. Sun...take that! At this record breaking temperature rate, I suspect that we will be playing in these fountains through December.


Related Posts Plugin for WordPress, Blogger...